Instructions
for setting up and using the SP-ZOOM-KIT-EZ and SP-ZOOM-KIT-EZ-PRO
Please
reference the following photos when connecting your kit. We will reference ZOOM
in the instructions, however, the same instructions apply if you are using a
different Teleconferencing program.
If
you are running your CAT program and ZOOM on the same computer, please
see below.
If
you are running your CAT program on one computer and
ZOOM on a second computer, continue
here:
1 - Before
plugging in this device for the first time (and anytime you switch to a different
computer), you must install the driver program on BOTH computers. Please click
here to download and run the driver installation program for this product
on both computers. When it finishes, please restart your computers.
2 - Plug the USB
connector labeled "C" into a USB port on the computer running
your real-time capture software (referred to as “CAT computer”
hereinafter). Take note which USB port you are using,
because you need to always use the same port on this computer for this purpose.
Plug the USB connector labeled "Z" into your computer running
Zoom or other video conferencing software (referred to as “Zoom Computer”
hereinafter). Take note which USB port you are using,
because you need to always use the same port on this computer for this purpose.
If you change ports on either computer, you will need to do the following setup
steps again on the new port. If you are using a USB hub on either computer,
note which ports you are using on the hub and which port you plug the hub into.
Windows remembers the settings for every USB port. Hint: If you also
use a USB microphone for in-person situations, you can use a different port
on the CAT computer for each purpose and you won't have to adjust your settings
each time you plug in the USB device. Windows will remember the settings for
each USB port.
2a - Optional:
If you want to make an additional backup recording, plug the 3.5mm plug on the
backup cable into the microphone input on your Steno writer or digital recorder.
When you are ready to record into your backup device, set the recording level
per the manufacturer's instructions, being very careful to keep the recording
level in the recommended range and NOT overloading. Generally, a "red"
indication on a recording level indicates overload.
3 - The following
applies to settings made in the Audio Commander program on the CAT computer:
a. Open the Andrea
Audio Commander. You can find this program by using the Windows search tool
(bottom left corner of the toolbar) or by looking in your program list under
Andrea Electronics/Audio Commander. This is the Audio Commander program

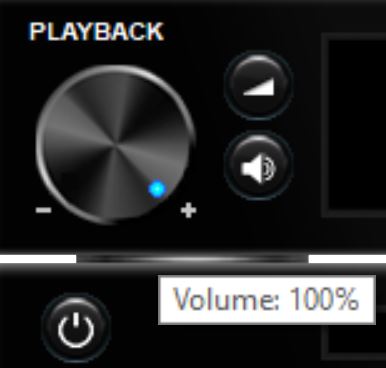
b. In the PLAYBACK
section, on the left side, under the word "PLAYBACK", put your pointer
on the blue dot and turn the large round knob to 100%.
c. To the right
of the PLAYBACK knob, you will find 2 small buttons. Click on the top button:

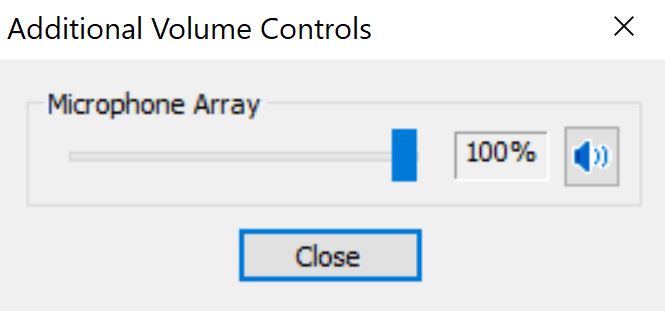
The "Additional
Volume Controls" window will open:
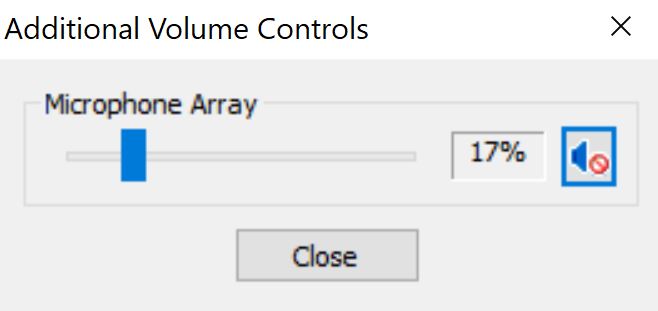
Set the "Microphone
Array" control to 30%. Click the speaker icon on the right to unmute
this control. This is what you should now see:
Click the "Close"
button.
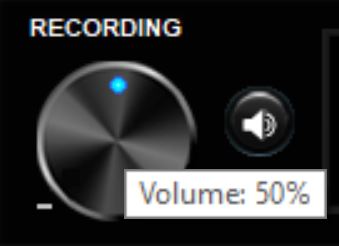
d. In the RECORD
section, on the left side, under the word "RECORDING", put your
pointer on the blue dot and turn the large round knob to 50%.
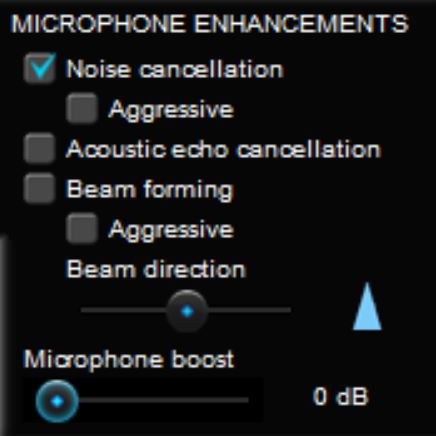
e. On the right
side of this section, in the "MICROPHONE ENHANCEMENTS" area, leave
"Noise cancellation" checked and uncheck everything else in this
section. Change the Microphone boost to "0 dB".
4 - The following
applies to settings made in the Audio Commander program on the ZOOM computer:
a. Open the Andrea
Audio Commander. You can find this program by using the Windows search tool
(bottom left corner of the toolbar) or by looking in your program list under
Andrea Electronics/Audio Commander. This is the Audio Commander program:
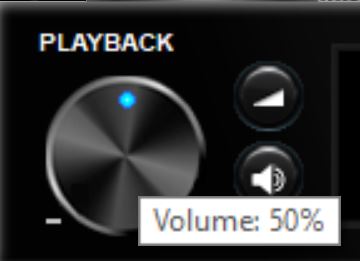
b. In the PLAYBACK
section, on the left side, under the word "PLAYBACK", put your pointer
on the blue dot and turn the large round knob to 50%.
c. To the right
of this knob, you will find 2 small buttons. Click on the top button:
The "Additional
Volume Controls" window will open:
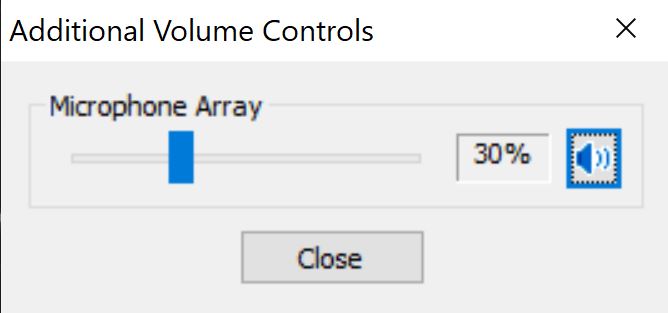
Set the "Microphone
Array" control to 100%. Click the speaker icon on the right to unmute
this control:
Click the "Close"
button.
c. In the RECORD
section, on the left side, under the word "RECORDING", put your
pointer on the blue dot and turn the large round knob to 100%.

d. On the right
side, in the "MICROPHONE ENHANCEMENTS" section, leave "Noise
cancellation" checked and uncheck everything else in this section. Change
the Microphone boost to "0 dB".
Important:
All levels are a starting point and may need to be adjusted as needed. View
the recording level meter in your CAT software to know where to adjust the
RECORDING LEVEL in the Audio Commander so that it gives you a strong recording
without exceeding the maximum recording level (usually indicated by
red lines in the recording level meter). Setting your recording level so that
your meters goes into the "red" will result in a scratchy, distorted
audio recording.
5 - In the Zoom
program, make sure that you select the "Andrea" device for Microphone and
the "Andrea" device for Speakers. In your CAT program, make sure you select
the "Andrea" device as your recording input device.
6 - We recommend
that you open a ZOOM conference with a friend and experiment with the levels.
Please adjust your levels so that you are able to hear the other ZOOM participants,
they can hear you and everyone is recorded clearly. Please do this well in advance
of your first important ZOOM meeting.
Please
follow these steps if you are running your CAT program and ZOOM on the same
computer:
1 - Please go to
www.soundprodrivers.com and download the driver program on your computer. After
it finishes downloading, run the program that downloaded. After it finishes
installing, restart your computer.
2 - Plug the USB
cable labeled with the letter C into a USB port on your computer. Take
note of the port you are using because you will need to always use the same
port for the USB cable labeled C. This cable corresponds to the
USB device that will be used for CAT program functions.
3 - Open the Andrea
Audio Commander. You can find this program by using the Windows search tool
(bottom left corner of the toolbar) or looking in your program list under Andrea
Electronics/Audio Commander. This is the Audio Commander program
4 - Look in the
playback section for the word Andrea in blue text

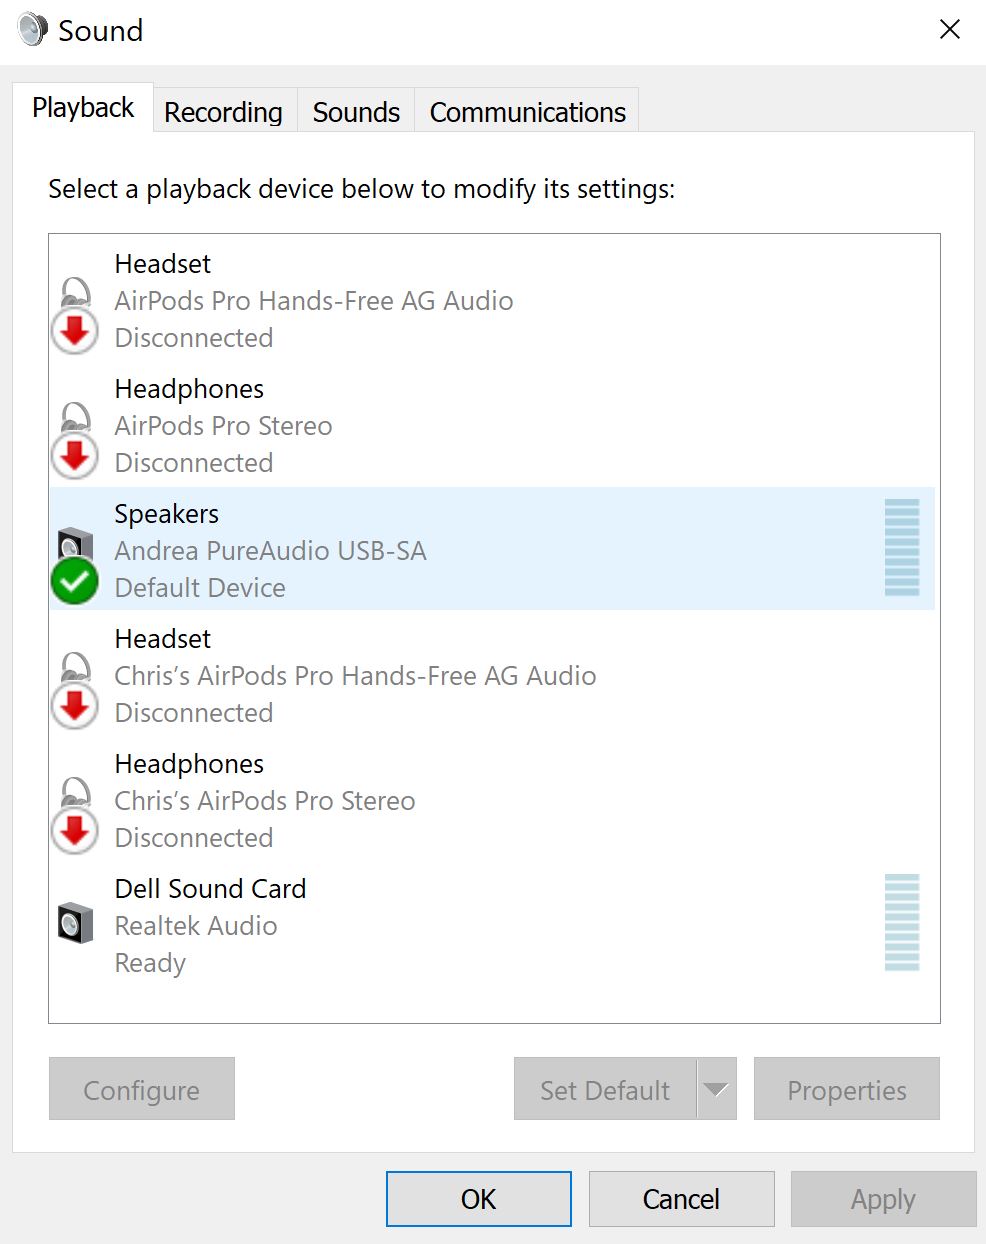
5 - Left-click
on the word Andrea in blue. This will open the windows Sound configuration box
on the playback tab. In
the list of devices, look for the word "Andrea":
6- Double left
click on the word "Andrea". This
will open up the "Speaker Properties" window:
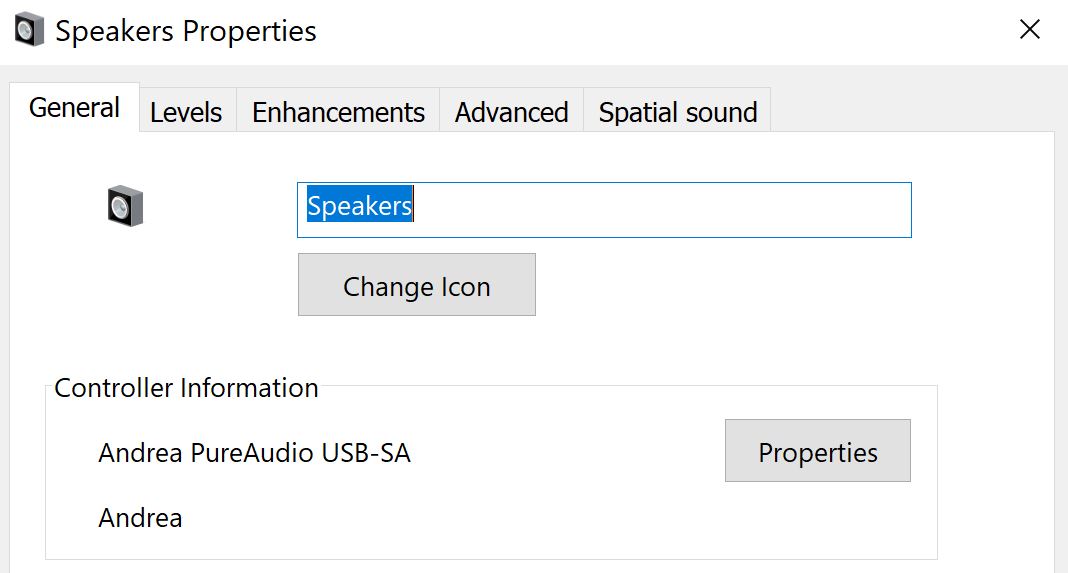
7- You will notice
that the title of the device is already highlighted so that you can change it.
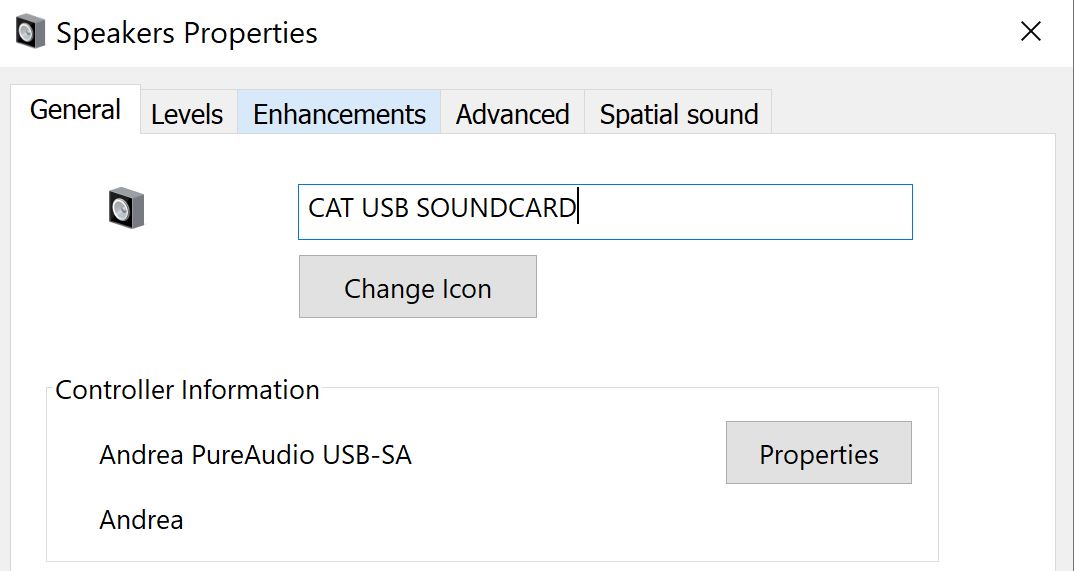
Please change this highlighted area to CAT USB SOUNDCARD.
8 - Click OK, then
click OK again to close the Windows sound box and return to the Andrea Audio
Commander.
a. In the PLAYBACK
section, on the left side, under the word "PLAYBACK", put your pointer
on the blue dot and turn the large round knob to 100%
To the right
of this knob, you will find 2 small buttons. Click on the top button
The "Additional
Volume Controls" window will open
Set the "Microphone
Array" control to 30%. Click the speaker icon on the right to unmute
this control
Click the "Close"
button.
b. In the RECORD
section, on the left side, under the word "RECORDING", put your
pointer on the blue dot and turn the large round knob to 50%
c. On the right
side of this section, in the "MICROPHONE ENHANCEMENTS" area, leave
"Noise cancellation" checked and uncheck everything else in this
section. Change the Microphone boost to "0 dB"
d.
Unplug the USB cable labeled with the letter "C"
9 - Plug the USB
cable labeled with the letter Z into a different USB port on your computer
from the one you used in the previous steps. Take note
of the port you are using because you will need to always use the same port
for the USB cable labeled Z. This cable corresponds to the USB
device that will be used for ZOOM program functions.
10 - Open the Andrea
Audio Commander and look in the playback section for the word Andrea in blue
text
11 - Left-click
on the word Andrea in blue. This will open the windows Sound configuration box
on the playback tab. In the list of devices, look for the word "Andrea"
12 - Double left
click on the word "Andrea". This will open up the "Speaker Properties"
window
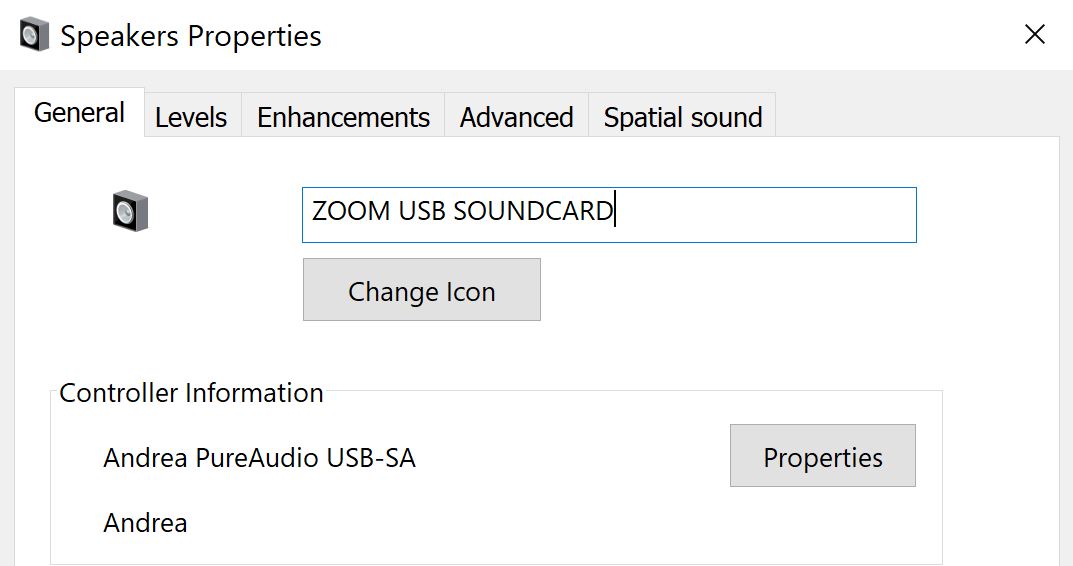
13 - You will
notice that the title of the device is already highlighted so that you can change
it. Please change this highlighted area to ZOOM USB SOUNDCARD.
14 - Click OK,
then click OK again to close the Windows sound box and return to the Andrea
Audio Commander.
a. In the PLAYBACK
section, on the left side, under the word "PLAYBACK", put your pointer
on the blue dot and turn the large round knob to 50%.
To the right
of this knob, you will find 2 small buttons. Click on the top button
The "Additional
Volume Controls" window will open
Set the "Microphone
Array" control to 100%. Click the speaker icon on the right to unmute
this control. This is what you should now see
Click the "Close"
button.
b. In the RECORD
section, on the left side, under the word "RECORDING", put your
pointer on the blue dot and turn the large round knob to 100%.
On the right
side of this section, in the "MICROPHONE ENHANCEMENTS" area, leave
"Noise cancellation" checked and uncheck everything else in this
section. Change the Microphone boost to "0 dB"
15
- Plug the USB cable labeled "C" back into the USB port you designated
for this cable.
16 - Optional:
If you want to make an additional backup recording, plug the 3.5mm plug on the
backup cable into the microphone input on your Steno writer or digital recorder.
When you are ready to record into your backup device, set the recording level
per the manufacturer's instructions, being very careful to keep the recording
level in the recommended range and NOT overloading. Generally, a "red"
indication on a recording level indicates overload.
Important:
All levels are a starting point and may need to be adjusted as needed. View
the recording level meter in your CAT software to know where to adjust the
RECORDING LEVEL in the Audio Commander so that it gives you a strong recording
without exceeding the maximum recording level (usually indicated by
red lines in the recording level meter). Setting your recording level so that
your meters goes into the "red" will result in a scratchy, distorted
audio recording.
17 - In the Zoom
program, make sure that you select the "Andrea" device for Microphone and
the "Andrea" device for Speakers. In your CAT program, make sure you select
the "Andrea" device as your recording input device.
18 - We recommend
that you open a ZOOM conference with a friend and experiment with the levels.
Please adjust your levels so that you are able to hear the other ZOOM participants,
they can hear you and everyone is recorded clearly. Please do this well in advance
of your first important ZOOM meeting.
Troubleshooting
If you need
assistance, please
contact us here.